.

.

.

.

Monday, December 19, 2016

All-Purpose Gluten-Free Flour Blend

All-Purpose Gluten-Free Flour Blend

*This is our own blend, created by reading many different blogs for ideas and then using the ingredients that we had on hand. 


making flour

All-Purpose Gluten-Free Flour Blend

2 cups brown rice flour
2 cups white rice flour
1 cup tapioca starch
1 cup potato starch
1/3 cup oat flour**
3 Tablespoons plus 1 teaspoon xanthan gum
2 Tablespoons Ultra Gel Starch 


** So here's the big question: Are oats truly gluten-free? Read on for the answer.

The short answer is YES — non-contaminated, pure oats are gluten-free. They are safe for most people with gluten-intolerance.
The main problem with oats in gluten-free eating is contamination. Most commercial oats are processed in facilities that also process wheat, barley, and rye. 

Most of the above flours can be purchased at the local grocery store. We were able to get both types of rice flours at Target and Ralphs. Both are available pretty much everywhere. We picked up tapioca starch at Seafood City. It was the cheapest flour ingredient we purchased at only $1.87 a package. 

The oat flour, xanthan gum and Ultra Gel we used were all from Honeyville Farms. When we went to Sprouts, we found everything we were looking for, plus so much more. We should have gone there first, instead of last. Amazon is also a good source for anything that you can't find locally.

Friday, December 16, 2016

Gluten-Free Bread

Soft Gluten-Free Bread 

The past several days have been filled with the excitement of a brand new grandbaby! We are also dealing with finals week and, of course, the hectic rush of the Holiday season.


Still, in amongst all of the crazy, I need to have real food to eat. So, today, we are baking up some bread. Just bread. 
  
Hoping for the best.*


*As luck would have it, we had to leave home just as this bread was due to be taken out of the oven. It baked for 35 minutes, with the last 5 being covered with aluminum foil to prevent over browning. 

The internal temperature reached 175 degrees. I would have liked to see it reach at least 200 degrees, but we did not have time to wait for that due to an unexpected family issue.

The taste is amazing. The almond milk gives it a slightly sweet, nutty flavor, but still keeps it in the sandwich bread zone. The texture, though, is very reminiscent of a banana bread. Extremely moist and dense.

I believe this is partially due to the use of 4 egg yolks in place of the normal two whole eggs. Because I like the flavor of the bread so much, I think I will try making it with two whole eggs and see what that does to the density.


Gluten-Free Bread 
INGREDIENTS:
3 Cups all purpose gluten-free flour
1½ teaspoons xanthan gum
1 Tablespoon + 1 teaspoon baking powder
1 teaspoon salt
2 teaspoons lemon juice
¼ cup extra virgin olive oil
4 egg yolks 
1½ cups almond milk
¼ cup honey
1 packet dry active yeast

INSTRUCTIONS:
Makes 9" x 5" Loaf 


Using measuring cup, measure out almond milk and warm in microwave for approximately 45 seconds, less if milk is not refrigerated. Milk should be warm but not hot to the touch.Hot milk will kill yeast; cold milk will not activate it. 

Add honey to warmed almond milk and stir, then add yeast. Yeast last. Set aside and allow yeast to rise for about 10 minutes.

Mix all purpose gluten-free flour, baking powder and salt together in small bowl.

Separate egg yolks from egg whites and add yolks to bowl of stand mixer. Add lemon juice and extra virgin olive oil. Using the the paddle attachment, blend wet ingredients just until combined. 

Add yeast mix and blend, again.

While mixer runs on low, add flour. Once all of the flour is added, turn up to on medium-high and beat for another 3 to 5 minutes.

Prepare your bread pan while the dough mixes. Because this is gluten-free dough, it is hard to over beat this mixture.


We sprayed the 9x5 pan with olive oil spray because EASY, and then we floured the pan and dumped out the extra, obviously gluten-free, flour into the sink. 

This dough is sticky, but has that nice yeasty bread smell! Using a spatula, notice our cute Holiday design, scrape dough into the bread pan. We needed the spatula and a few fingers to convince this gooey sticky dough to go where we wanted it to go.


Now is the time to preheat your oven to 375 degrees. This allows your bread dough to rise on top of the stove while the oven heats up. We allowed 40 minutes for our bread to rise and it did not quite get to the top of the pan.

Bake for 35-40 minutes. 

Monday, December 12, 2016

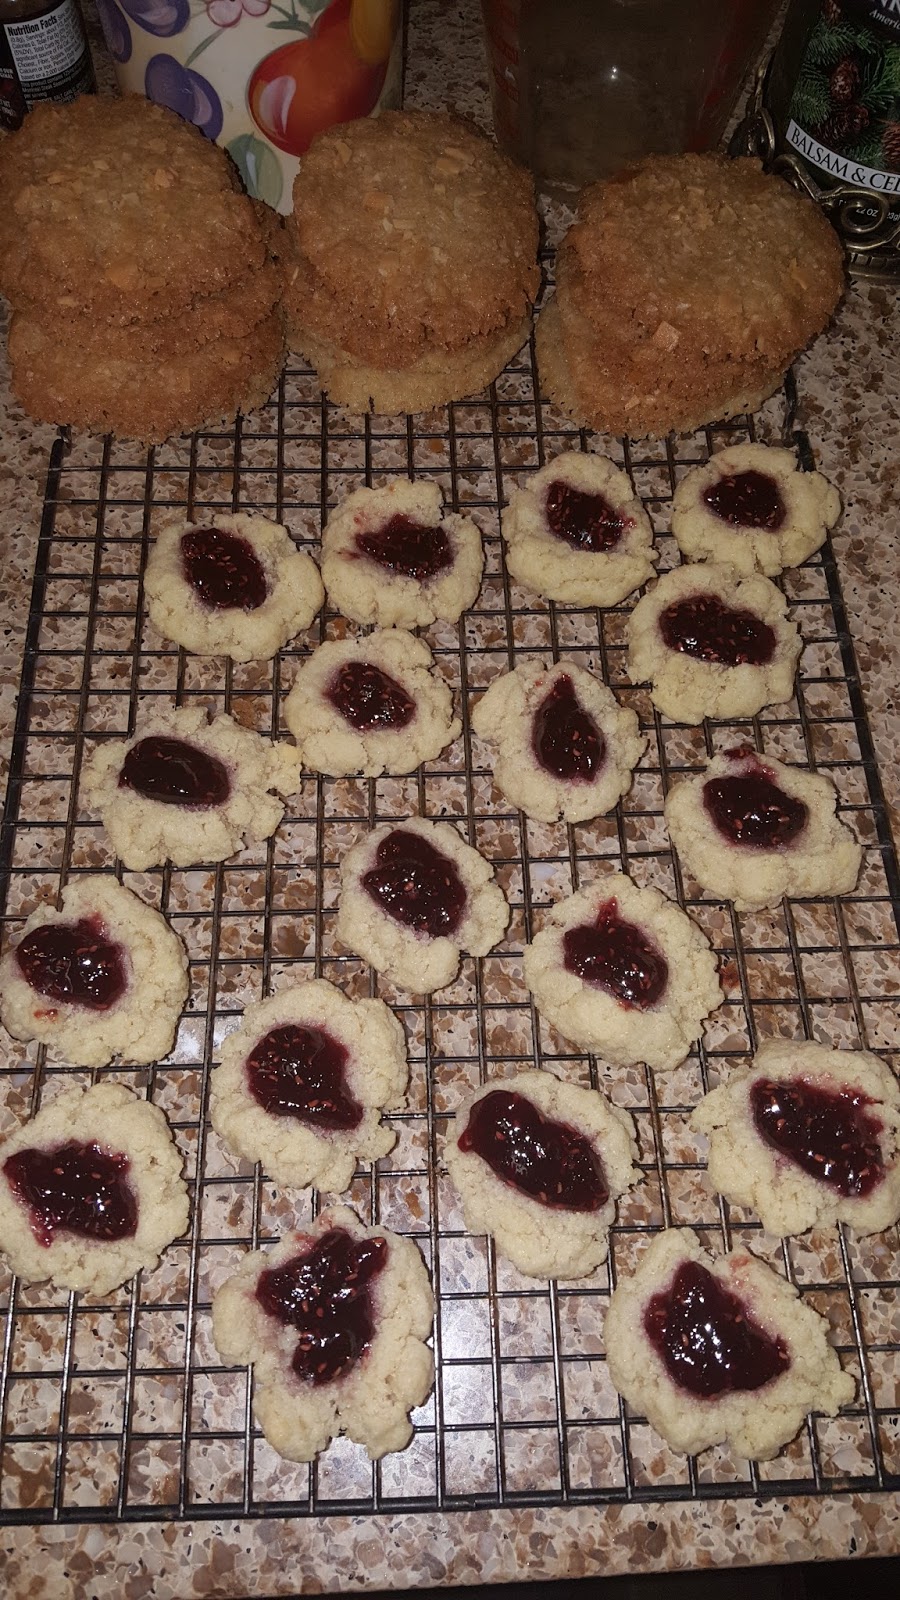
Jam-filled Thumbprint Cookies (Gluten-Free)

Jam-filled Thumbprint Cookies (Gluten-Free)


Yesterday was our peanut butter and jelly baking day. A few days ago I used Target's Cartwheel to get 25% off of their Market Pantry Jam. With a new jar of jam, I need a recipe to make use of this new bargin. 


Having never made Thumbprint Cookies before, I was not expecting to like them, but these are really good! Good enough, that I had to go back and write down the recipe, since I was just throwing ingredients into the bowl rather haphazardly.

But, I am actually going to make this recipe, again!

These cookies are soft and chewy. They remind me very much of the cookies that are sold by Knott's Berry Farm
Having made them, now, I am thinking they would also work well with apple jelly and the addition of 1/2 teaspoon of cinnamon. Perhaps, that will be the next version I make of these Jam-filled Thumbprint Cookies.


Ingredients:
2 cups fine milled almond flour
1/2 cup all purpose gluten-free flour
1/2 cup white sugar
1/2 cup coconut oil
1 large egg or 2 egg yolks (for people allergic to egg whites)
1 teaspoon vanilla extract
1 teaspoon baking powder
1/2 teaspoon salt
1/3 cup favorite jam

Directions:
Preheat the oven to 350 degrees.


I made this recipe late in the day, after baking for hours. Therefore, I just threw all of the ingredients into the stand mixture. This avoided multiple bowls and allowed me to clean and make the dough at the same time.


To begin with, I put the almond flour in and let the mixer beat out the lumps. Then, I added the all purpose gluten-free flour. While these two flours blended, I straightened up a day’s worth of baking in my kitchen.  I put the sugar, baking powder and salt into mixer while it continued to spin away.

Without ever turning mixer off, I added the egg and vanilla and finally the coconut oil. The oil was added ¼ cup at a time. This makes for a very damp, oily dough.

Roll the dough into 1" balls and place on cookie sheet with parchment paper. Again, your hands will get very oily.

Yes, these are ‘thumbprint’ cookies, but I use a small spoon to make an indentation in the center of each cookie for the jam, halfway down or a bit more. Remember, oily. The spoon works great! Then, reform the cookie into a more even ball shape, as they tend to crack when you make the indentation.

Fill up the center of each cookie with about a 1/2 teaspoonful of your favorite jam. It is probably not a good idea to lick the spoon after filling each cookie, because even though the cookies will be baked, but the jar of jam will be filled with all of those germs. (This is my own personal reminder!)

Bake for 10 minutes. The cookies should be lightly brown on bottom.


Let cookies cool on pan for a few minutes or they will crumble apart, then remove to a wire rack and cool completely.

Makes about 30 cookies.


Sunday, December 11, 2016

Baking with the Husband

Thin and Crispy Gluten-Free Coconut Cookies
http://glutenfreeonashoestring.com/thin-crispy-gluten-free-coconut-cookies/


Spending the afternoon baking, the husband wants to join in the fun. He wants to bake some cookies that remind him of Christmas' Past. Still, being conscious of my dietary limitations, he looked up a recipe that was gluten-free, all on his own, and is baking up a batch by himself.


The recipe he found is from the blog, Gluten-Free on a Shoe String.

This project is 100% his own. (And, of course, the people from Gluten-Free on a Shoe String.) I love company in the kitchen.


The husband put ALL of the ingredients into the mixer before turning it on. Everything still mixed together just fine. Stand mixers are just perfect for him.

In typical fashion, this blog post is being written as we bake. I can tell you already, the 5 minutes he says these cookies need to bake is not nearly enough time. When we pulled them out, they were light yellow and not crystallized, at all.

They also have a very candy like sweetness, even using unsweetened coconut. I am adding two more tablespoons of coconut oil to his batter and some salted coconut chips, crushed. Hopefully this will cut some of the super sweetness down.


Otherwise, I think I would cut the white sugar down by a 1/4 cup and increase the salt by 1/2 teaspoon to try and cut some of the sweetness down. Then again, even as I watched, the husband was rather loose with the measuring, so perhaps his cookies and mine would be different in sweetness.


We also increased the baking time to ten minutes. We topped the cookies with some of the crumbled up coconut chips, as well. The added time added a nice carmelly edge to the cookies. Our recipe made exactly 27 3" cookies.


Peanut Butter Blossom Cookies

Christmas Cookie Time!
I am starting my holiday baking the same way I start every year, with Peanut Butter Blossom Cookies. They are my favorite. I mean, what's not to love, chocolate, peanut butter, deliciousness!

I have already worked up a peanut butter (okay, sun butter) cookie, so I am just going to tweak that a bit. 

There are many versions of this cookie. I am absolutely a Brach's Chocolate Stars purist. They stay soft long after the cookies cool, so you never have a hard time biting into the cookie because of the chocolate. Other, unnamed chocolates have to be eaten all in one bite. Not the way cookies would be eaten.


Peanut Butter Blossom Cookies
Ingredients:
24 Brach’s Chocolate Stars
1 cup creamy Peanut Butter
1/3 cup all purpose gluten free flour
1/3 cup granulated sugar
1/3 cup packed brown sugar light or dark (I use whatever I happen to have on hand)
1 teaspoon vanilla extract
1/2 teaspoon baking soda
1/2 teaspoon salt (adjust depending upon peanut butter and personal taste)
1 egg or two egg yolks
Additional granulated sugar for rolling

Directions:
Heat oven to 350°F.
Beat peanut butter, sugars and vanilla together in a large bowl or stand mixing bowl. Add egg and beat mixture well.

Mix flour, baking soda and salt together in separate bowl. 

Then, add to peanut butter mixture. Beat well.

Shape dough into I ¼ inch balls and roll in granulated sugar. Place on parchment paper on cookie sheet or onto ungreased cookie sheet.


Bake 6-7 minutes. 

Press a chocolate star into center of each cookie; they will crack around edges. Bake for an additional 2 minutes. 

Cool a few minutes before removing from cookie sheet to wire rack, or they will fall apart. Remove to wire rack and cool completely.


Makes about 2 dozen cookies.


Sunday, December 4, 2016

Sage dressing with sausage, onions and celery -- gluten-free

Sage dressing* with sausage, onions and celery -- gluten-free

As I work on dressing for tonight's dinner, I am also waiting to hear from my daughter about the birth of my new granddaughter. Perhaps that is what has given me more creative energy than on a typical day. 

The kids are joining us for a post Thanksgiving dinner which will be followed up by an evening of Christmas light viewing up at the local Light Show on Thoroughbred Ave

As I made up my typical batch of dressing, I realized I really did not want to get sick again, I like I did last week, on Thanksgiving, when I consumed all of the regular wheat and dairy foods. So, in addition to making dressing for everyone else, I decided to make a batch just for me.

My daughter, who is currently busy with all of the baby business, sent me a recipe for gluten-free dressing a few weeks before Thanksgiving. While the recipe is somewhere within the depths of my phone, I do remember the most important part: cut loaf of gluten-free bread into cubes and toast into stuffing 'mix'. That is where I am beginning.


Once I have the bread all cut into perfect bread cubes, I use extra virgin olive oil to oil a cookie sheet. 
Then, I spread the 'croutons' out upon the oil and lightly oil the tops of the croutons, as well. lightly toss the cubes until coated with oil. Then, using powdered sage or poultry seasoning, salt and pepper, season the croutons. Toss, again.

Put pan into pre-heated 350 degree oven. Bake for 10 minutes. Pull out and stir. Bake for another 10 minutes. Stir again. Bake for another 5 to 10 minutes until nice and crunchy.

I am using the mixings, I reserved from making my regular batch of dressing, to mixing into my baked stuffing croutons. They include Jimmy Dean's Regular Breakfast Sausage, celery, red and white onions. In the past, I have always made my dressing with butter, lots and lots of butter. This year, I used only extra virgin olive oil for all of my frying of vegetables and mixing in to flavor the chicken broth for basting our turkey. 

Because I poured my 'hot' croutons straight from the cookie sheet into a glass bowl, I put a metal spoon into the bowl first, to dissipate the heat and keep the bowl from cracking. Then, I added my sausage and veggie mixture.

Finally, I added chicken stock which has been heated up in the same pan I fried both the meat and the vegetables. This gets all of the tasty dripping from the bottom of the pan, and the heat helps the moisture soak into the croutons. The croutons should get enough moisture to begin to soften, but not be soggy.

At this point, you can add more sage and salt and pepper to taste.

Put into bread loaf pan that has been oiled with extra virgin olive oil and cover with foil. Bake 30 minutes. Remove foil for last 10 minutes for crunchier top.

INGREDIENTS

4 cups gluten free croutons  (loaf of gluten-free bread)
1/2 cup sausage
1 stalk celery
1/4 white onion
1/4 red onion
1-1/2 cups chicken stock
2 teaspoons sage powdered (this is to taste)
salt
pepper
extra virgin olive oil

*A fact I sadly did not know for most of my adult life: The difference between dressing and stuffing is dressing never gets 'stuffed' inside of a bird, turkey or otherwise. And, since I don't like to stuff my birds, since it slows down the cooking process, I guess I ALWAYS make DRESSING.

Saturday, December 3, 2016

Apple Dried-Cranberry Pecan Praline Gluten-Free Pie

Apple Dried-Cranberry Pecan Praline Gluten-Free Pie
We are using a pre-made gluten free pie crust for this recipe, because EASY!!!


INGREDIENTS:
FILLING
5 large apples, peeled cored, and sliced - we used Honey-crisp apples
1⁄2 cup dried cranberries
1⁄2 cup praline pecans ground up in food processor until they about same size as dried cranberries
1⁄4 cup sugar
1⁄2 teaspoon lemon juice
2 Tablespoons gluten-free flour (you can use praline pecans  processed to fine powder in place of gluten-free flour)

CRUMBLE TOPPING
1⁄2 cup quick cook oats
2 Tablespoons brown sugar
4 Tablespoons non dairy butter melted
1⁄4 cup praline pecans ground up in food processor until they about same size as dried cranberries

DIRECTIONS:
Preheat oven to 400°F
Mix apples, cranberries, sugar, lemon juice, pecans together in bowl; set aside.

Place filling in the center of the pastry, heaping in center. Because gluten-free crusts tend to fall apart, I made a crumble topping in place of the second crust to use on top of the apple cranberry filling. 


Mix oats, brown sugar, melted butter and crumble mixture over apples crumble. Finish with 1⁄4 cup praline pecans ground up over the top.


Bake for 35 minutes on cookie sheet to prevent filling from bubbling over into oven.

Remove pie and cover with foil to prevent crust from burning. Bake for additional 15 minutes. 

Take pie from oven and remove from cookie sheet and cool on a wire rack.

Pie can be stored at room temperature until served. Serves 8.