.

.

.

.
Showing posts with label cookies. Show all posts

Monday, December 19, 2016

Better Brighter Bigger Peanut Butter Blossom Cookies

Better Brighter Bigger Peanut Butter Blossom Cookies 
Gluten-Free, of course!


I worked up a version of this recipe of couple of weeks ago, and I was okay with it. Then, my elder California daughter came home and stated, "Why can't we just have good Christmas cookies?"

That's when I realized that I was doing exactly what I had said I wasn't going to do. I was settling for good enough instead of great, fantastic tasting food. Look how quickly I learned that delicious gluten-free foods are the exception, not the norm.


So, today, while I was making up another batch of my gluten-free all purpose flour, link to recipe  I came across flours that I had kind of forgotten about. Most importantly, oat flour. I have decided to try this flour to add more structure to the Peanut Butter Blossom Cookies. Also, since the original, full gluten recipe has butter in it, I am adding 'butter' into this recipe, as well.

And, finally, I am increasing the amount of baking soda to give these cookies more airiness and a cake-like, less gritty texture. Also, more vanilla is always welcome, in my book. That is a personal preference, as always.

Natalie, getting up late, after having worked late into the night, tastes this new recipe after all of the cookies are out of the oven and cooled. One bite in, she says the cookie's peanut buttery flavor bursts into her mouth. 

A soft cookie, it holds itself together better than the average gluten-free cookie. In fact, other than being a bit grittier than typical peanut butter cookies, these are about as close to a 'normal' wheat flour cookie that we have come.


Better Brighter Bigger Peanut Butter Blossom Cookies 

Ingredients:
30 Brach’s Chocolate Stars
1 cup creamy Peanut Butter
1/3 cup dairy free butter (I use olive oil based)
1/2 cup all purpose gluten free flour
1/4 cup gluten free oat flour
1/3 cup granulated sugar
1/3 cup packed brown sugar light or dark (I use whatever I happen to have on hand)
2 teaspoons vanilla extract
1 teaspoon baking soda
1/2 teaspoon salt (adjust depending upon peanut butter and personal taste)
1 egg or two egg yolks
Additional granulated sugar for rolling

Directions:
Heat oven to 350°F.
Beat peanut butter, dairy-free butter, sugars and vanilla together in a large bowl or stand mixing bowl. Add egg and beat mixture well.

Mix all purpose gluten-free flour, oat flour, baking soda and salt together in separate bowl. 

Then, add to peanut butter mixture. Beat well.

Shape dough into I ¼ inch balls and roll in granulated sugar. Place on parchment paper on cookie sheet or onto ungreased cookie sheet. Flatten slightly.


Original batch of Peanut Butter Blossom Cookies 
above new recipe below

Bake 8 minutes. 

Press a chocolate star into center of each cookie. Bake for an additional 2 minutes. 

Cool a few minutes before removing from cookie sheet to wire rack. Remove to wire rack and cool completely.


Makes about 2 1/2 dozen cookies.

Monday, December 12, 2016

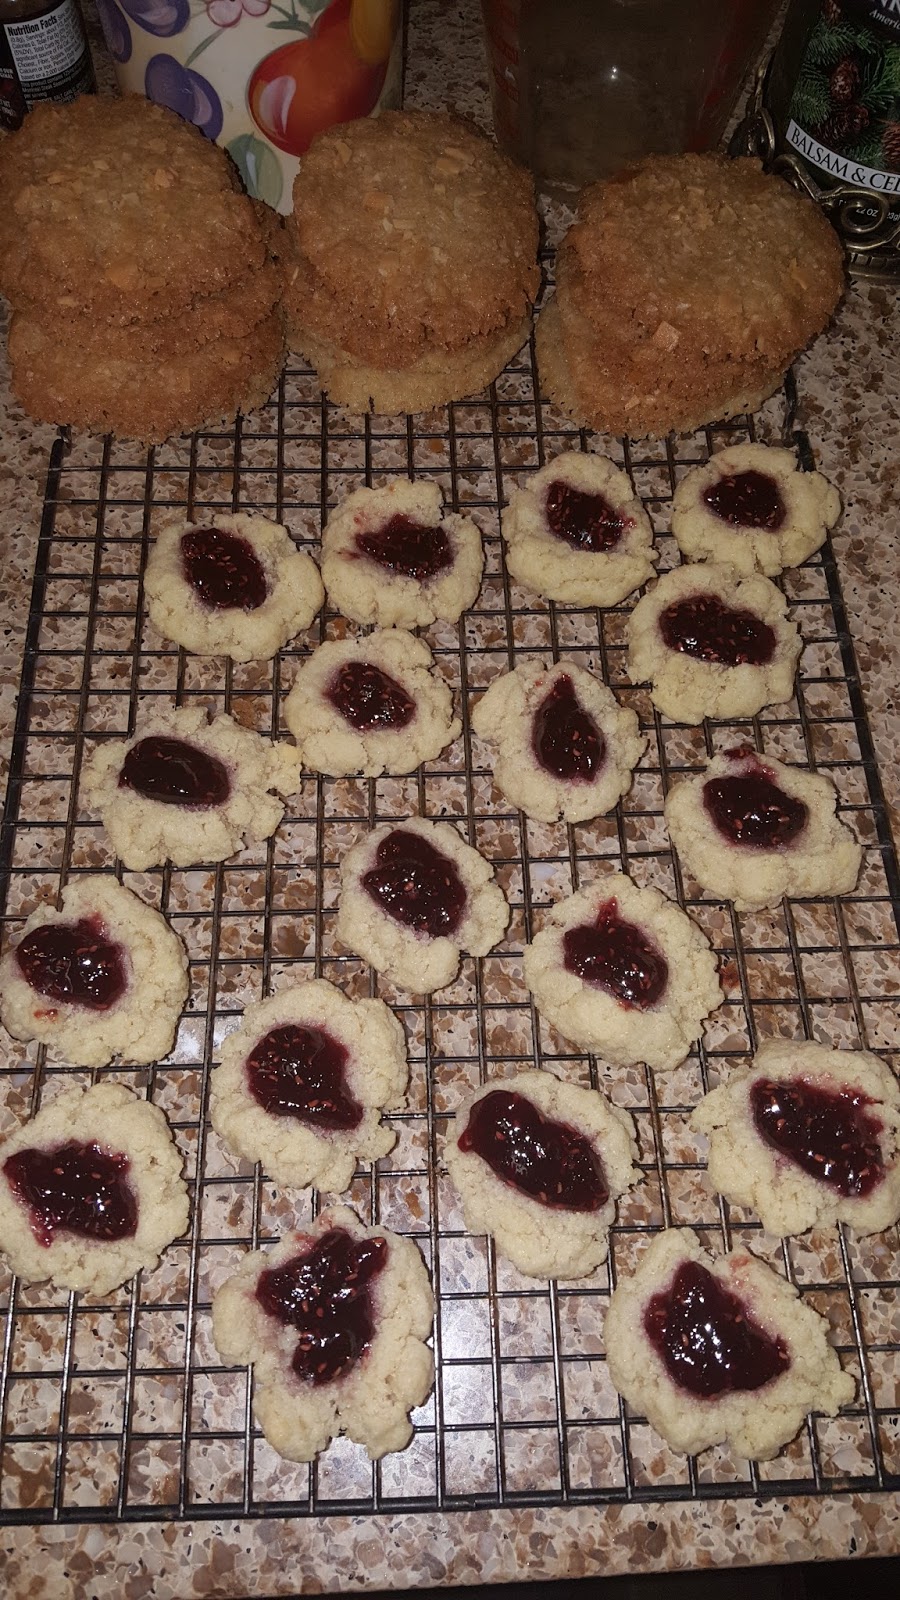
Jam-filled Thumbprint Cookies (Gluten-Free)

Jam-filled Thumbprint Cookies (Gluten-Free)


Yesterday was our peanut butter and jelly baking day. A few days ago I used Target's Cartwheel to get 25% off of their Market Pantry Jam. With a new jar of jam, I need a recipe to make use of this new bargin. 


Having never made Thumbprint Cookies before, I was not expecting to like them, but these are really good! Good enough, that I had to go back and write down the recipe, since I was just throwing ingredients into the bowl rather haphazardly.

But, I am actually going to make this recipe, again!

These cookies are soft and chewy. They remind me very much of the cookies that are sold by Knott's Berry Farm
Having made them, now, I am thinking they would also work well with apple jelly and the addition of 1/2 teaspoon of cinnamon. Perhaps, that will be the next version I make of these Jam-filled Thumbprint Cookies.


Ingredients:
2 cups fine milled almond flour
1/2 cup all purpose gluten-free flour
1/2 cup white sugar
1/2 cup coconut oil
1 large egg or 2 egg yolks (for people allergic to egg whites)
1 teaspoon vanilla extract
1 teaspoon baking powder
1/2 teaspoon salt
1/3 cup favorite jam

Directions:
Preheat the oven to 350 degrees.


I made this recipe late in the day, after baking for hours. Therefore, I just threw all of the ingredients into the stand mixture. This avoided multiple bowls and allowed me to clean and make the dough at the same time.


To begin with, I put the almond flour in and let the mixer beat out the lumps. Then, I added the all purpose gluten-free flour. While these two flours blended, I straightened up a day’s worth of baking in my kitchen.  I put the sugar, baking powder and salt into mixer while it continued to spin away.

Without ever turning mixer off, I added the egg and vanilla and finally the coconut oil. The oil was added ¼ cup at a time. This makes for a very damp, oily dough.

Roll the dough into 1" balls and place on cookie sheet with parchment paper. Again, your hands will get very oily.

Yes, these are ‘thumbprint’ cookies, but I use a small spoon to make an indentation in the center of each cookie for the jam, halfway down or a bit more. Remember, oily. The spoon works great! Then, reform the cookie into a more even ball shape, as they tend to crack when you make the indentation.

Fill up the center of each cookie with about a 1/2 teaspoonful of your favorite jam. It is probably not a good idea to lick the spoon after filling each cookie, because even though the cookies will be baked, but the jar of jam will be filled with all of those germs. (This is my own personal reminder!)

Bake for 10 minutes. The cookies should be lightly brown on bottom.


Let cookies cool on pan for a few minutes or they will crumble apart, then remove to a wire rack and cool completely.

Makes about 30 cookies.


Sunday, December 11, 2016

Baking with the Husband

Thin and Crispy Gluten-Free Coconut Cookies
http://glutenfreeonashoestring.com/thin-crispy-gluten-free-coconut-cookies/


Spending the afternoon baking, the husband wants to join in the fun. He wants to bake some cookies that remind him of Christmas' Past. Still, being conscious of my dietary limitations, he looked up a recipe that was gluten-free, all on his own, and is baking up a batch by himself.


The recipe he found is from the blog, Gluten-Free on a Shoe String.

This project is 100% his own. (And, of course, the people from Gluten-Free on a Shoe String.) I love company in the kitchen.


The husband put ALL of the ingredients into the mixer before turning it on. Everything still mixed together just fine. Stand mixers are just perfect for him.

In typical fashion, this blog post is being written as we bake. I can tell you already, the 5 minutes he says these cookies need to bake is not nearly enough time. When we pulled them out, they were light yellow and not crystallized, at all.

They also have a very candy like sweetness, even using unsweetened coconut. I am adding two more tablespoons of coconut oil to his batter and some salted coconut chips, crushed. Hopefully this will cut some of the super sweetness down.


Otherwise, I think I would cut the white sugar down by a 1/4 cup and increase the salt by 1/2 teaspoon to try and cut some of the sweetness down. Then again, even as I watched, the husband was rather loose with the measuring, so perhaps his cookies and mine would be different in sweetness.


We also increased the baking time to ten minutes. We topped the cookies with some of the crumbled up coconut chips, as well. The added time added a nice carmelly edge to the cookies. Our recipe made exactly 27 3" cookies.


Peanut Butter Blossom Cookies

Christmas Cookie Time!
I am starting my holiday baking the same way I start every year, with Peanut Butter Blossom Cookies. They are my favorite. I mean, what's not to love, chocolate, peanut butter, deliciousness!

I have already worked up a peanut butter (okay, sun butter) cookie, so I am just going to tweak that a bit. 

There are many versions of this cookie. I am absolutely a Brach's Chocolate Stars purist. They stay soft long after the cookies cool, so you never have a hard time biting into the cookie because of the chocolate. Other, unnamed chocolates have to be eaten all in one bite. Not the way cookies would be eaten.


Peanut Butter Blossom Cookies
Ingredients:
24 Brach’s Chocolate Stars
1 cup creamy Peanut Butter
1/3 cup all purpose gluten free flour
1/3 cup granulated sugar
1/3 cup packed brown sugar light or dark (I use whatever I happen to have on hand)
1 teaspoon vanilla extract
1/2 teaspoon baking soda
1/2 teaspoon salt (adjust depending upon peanut butter and personal taste)
1 egg or two egg yolks
Additional granulated sugar for rolling

Directions:
Heat oven to 350°F.
Beat peanut butter, sugars and vanilla together in a large bowl or stand mixing bowl. Add egg and beat mixture well.

Mix flour, baking soda and salt together in separate bowl. 

Then, add to peanut butter mixture. Beat well.

Shape dough into I ¼ inch balls and roll in granulated sugar. Place on parchment paper on cookie sheet or onto ungreased cookie sheet.


Bake 6-7 minutes. 

Press a chocolate star into center of each cookie; they will crack around edges. Bake for an additional 2 minutes. 

Cool a few minutes before removing from cookie sheet to wire rack, or they will fall apart. Remove to wire rack and cool completely.


Makes about 2 dozen cookies.


Wednesday, November 30, 2016

Lemon Orange Zest Snowballs - Gluten Free

Lemon Orange Zest Snowballs - Gluten Free 

It has been a while since I added any new recipes to this blog. With the Holidays quickly approaching, I am well aware that all of my cookie recipes are filled with butter, wheat, eggs and deliciousness. 

Basically meaning, I can't use any of them. In the weeks since I last put up any recipes, I learned that wheat and dairy products are really bad for me. That, and sesame. Cheating on Thanksgiving put me in bed for three days. 

But, things like eggs and peanut butter, I have a little bit more wiggle room. So, today, I am going to work on a recipe that has egg white in it. My plan is to only use a little of certain ingredients, here and there, and substitute in places where it works easily. Or at least easier.

Lemon is one of my favorite flavors, so I have been looking at many recipes over the past several weeks. This is what I have developed from putting several different ideas together. This recipe has no butter or oil, only almond flour and other basic ingredients.


And, in typical fashion, I have lemon juice, but no lemons, so I am going to use orange zest instead of lemon zest. That way, not only do I get zest, I get to eat the fresh orange. Citrus season in California is fabulous.

These cookies turned out delicious! This is definitely a recipe to be repeated!


Ingredients
2 large egg whites
2 cups fine milled almond flour
1 cup white sugar
1 large orange zested (orange for snacking)
3 cranks of Himalayan pink salt mill or 1/8 teaspoon
2 Tablespoons lemon juice
powdered sugar to roll cookies before baking

Directions 
Preheat oven to 350°F 
Line cookie sheet with parchment paper.

Start beating egg whites at medium speed in stand mixer until soft peaks form or use an electric hand mixer until the same soft peaks occur.  In separate bowl, mix almond flour and white sugar with a fork. Stir out majority of lumps from almond flour. Mix orange zest, lemon juice and salt into flour mixture. Add to egg mixture in two batches. Beat on medium until combined. Dough will be sticky.

Roll dough into 1 1/2 tablespoons size balls, and then roll them in the powdered sugar. Place cookies on parchment papered cookie sheet. Cookies do not spread, so as long as they don't touch, you can put them close together. 

This batch makes about a dozen and a half cookies, so depending on size of your pan, you could possibly bake entire batch at one time.


Bake for 15 to 16 minutes. The bottoms of the cookies will be lightly browned. Cool slightly then remove from baking sheet to keep cookies from over-browning. 

Cookies will have a firm outer edge and soft gooey middle. Because of soft nature, they are best when eaten within a couple of days.

Monday, September 12, 2016

Sunflower Seed Butter Monster Cookies


Yes, another day, another cookie recipe. In case you haven't noticed, we work up a recipe first, and then bake it up. Meaning, as I am typing these first few words, we have not baked anything, yet. Since the easiest way to record what ingredients we decide upon is just to write them right into this blog, we are literally testing the recipes as we go. 

Monster cookies is a recipe the we have made for many, many years. At the beginning of the school year, we would make up a big batch of monster cookies, and freeze them. Then, when the kids came home from school, or play rehearsal, or football practice, there were always giant cookies to snack on. Of course, I ate many of them, myself.

So, this is our first test of gluten free Monster Cookies. In order to cut down on the number of eggs we are going through, we have decided to test out a version of this recipe using mayonnaise as a substitute for part of the eggs. 


We are also in disagreement, at the moment, as to how much vanilla to use. I always increase the amount of vanilla in a recipe, Natalie has taken that idea and doubled up again. She believes we should add a whole tablespoon of vanilla to this recipe. Considering we start with Mexican vanilla, which is a very strong vanilla, to begin with, that will make these very, very vanilla-ey, indeed. 


Also note, even though we replaced the butter in this recipe with a butter free blend, this is not a dairy-free recipe because of the M&Ms


 Sunflower Seed Butter Monster Cookies 

Ingredients:
1/3 cup dairy-free butter blend
6 tablespoons mayonnaise (yolk only type)
3 egg yolks
1 cup packed brown sugar
1 cup sugar
1 1/2 cups sunflower seed butter
1 1/2 tsp vanilla
2 tsp baking soda
1 tsp salt
4 1/2 cups oats
1 cup semi-sweet chocolate chips
1/2 cup milk chocolate M&M's
1/2 cup dark chocolate M&M's

Instructions:
Preheat oven to 350°.
In large bowl, cream together butter, sugars, sunflower seed butter, egg yolks and mayonnaise until well blended and creamy. Add vanilla.

Mix in baking soda and oats. Mix on low until well incorporated. Stir in chocolate chips and milk chocolate and dark chocolate M&M's.

Using a large spoon, scoop dough onto ungreased cookie sheets. Cookies do not spread much so flatten slightly before baking. Bake at 350° for 12-14 minutes. Remove from oven and cool a couple of minutes. Move to wire racks.


During the first test run, we ended up with more granola, than cookies. so we added another egg yolk to our batter. The additional yolk helped hold the cookies together better and, as Natalie says, "Gives them more poof. We also added a teaspoon of salt to our original recipe. We are learning that sunflower seed butter cooks up much sweeter than peanut butter. The salt helps to cut that sweetness.

Our oven cooks on the hotter side, so 12 minutes is plenty long enough for our cookies to bake and still have a bit of moist gooey inside.


This is, by far, our best recipe, to date. And yes, I realize that there are not very many recipes on this blog, yet, There are many attempts we have not recorded, as of this time. And a few that will fade away forever. Blah! Sunflower Seed Butter Monster Cookies, however, are definitely worth the effort of baking up several more batches!

Monday, September 5, 2016

Our Chocolate Chip Cookies


This weekend, we created a cookie that not only works with every single allergy restriction on our list, everyone that was here visiting for Laborgiving, loved them, as well!


Our Chocolate Chip Cookies

cup packed brown sugar
3/4 cup granulated sugar
cup dairy-free butter blend
teaspoons gluten-free vanilla
egg yolks
2 1/2 cups all-purpose gluten free flour blend*
teaspoons xanthan gum
teaspoon gluten-free baking powder
teaspoon baking soda
1/2 teaspoon salt
cup semisweet chocolate chips 

Directions

Pre-heat oven to 375°F. 
In large bowl, beat together sugars, butter and vanilla with electric mixer on low until well blended. Add egg yolks until well incorporated. In separate bowl, mix all purpose gluten-free flour with xanthan gum, baking powder, baking soda and salt until well blended. Stir dry mixture into wet butter mixture. Add chocolate chips. 3 Use ungreased cookie sheets and place cookie dough about 2 inches apart. Flatten slightly. Bake 7 to 9 minutes.  Let cool slightly then move to cooling racks. Makes about 3 dozen cookies.


*This is our own blend, created by reading many different blogs for ideas and then using the ingredients that we had on hand. We finally had to give up on finding potato flour. It simply does not exist in our area. 


making flour

All-Purpose Gluten-Free Flour Blend

2 cups brown rice flour
2 cups white rice flour
1 cup tapioca starch
1 cup potato starch
1/3 cup oat flour**
3 Tablespoons plus 1 teaspoon xanthan gum
2 Tablespoons Ultra Gel Starch 


** So here's the big question: Are oats truly gluten-free? Read on for the answer.

The short answer is YES — non-contaminated, pure oats are gluten-free. They are safe for most people with gluten-intolerance.
The main problem with oats in gluten-free eating is contamination. Most commercial oats are processed in facilities that also process wheat, barley, and rye. 

Most of the above flours can be purchased at the local grocery store. We were able to get both types of rice flours at Target and Ralphs. Both are available pretty much everywhere. We picked up tapioca starch at Seafood City. It was the cheapest flour ingredient we purchased at only $1.87 a package. 

The oat flour, xanthan gum and Ultra Gel we used were all from Honeyville Farms. When we went to Sprouts, we found everything we were looking for, except potato flour. We should have gone there first, instead of last. Amazon is also a good source for anything that you can't find locally.

We also purchased Smart Balance dairy-free butter blend at Sprouts for almost $2.00 less than at Ralphs so shopping around makes a big difference. Just over $4.00 instead of $6.00 sure sounds better to me.


We also baked a couple of crust-free pumpkin pies. No crust, so we just used 9" square pans. One with and one without dairy and eggs. Both worked. Next time, we will definitely use double egg yolks instead of egg replacement. I am so glad that that is an option for us.

Today, we finished off the pumpkin we had left over, baking up a pan of gluten free pumpkin bars. Did you know that Betty Crocker's Cream Cheese Frosting is dairy free, soy free and gluten free? Happy times!